Xsilva Web Store Tip:Get Product Price In Related Products Slider

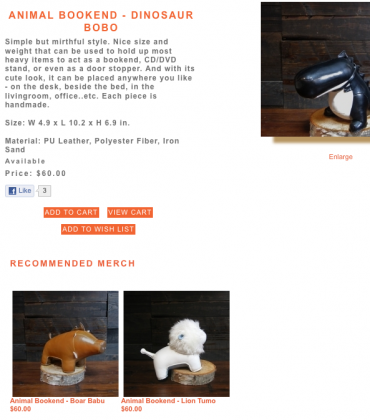
If you’re into customizing the Xsilva LightSpeed Web Store you might find it handy to be able to make the way products are displayed in the slider more like the way they appear in your main product list and your Custom Pages. Over the years I’ve had lots of requests relating to redesigning the slider that shows on a Custom Page but not many of my clients actually use the slider that appears in the Product Details Page so I hadn’t really ever bothered with it. Right away I noticed the Related Products Slider shows the product code – not the price. It can be pretty ugly especially if your product codes look like “PGH-34rjd”. I can imagine this is useful for sites that sell machine parts but the average customer is probably not ever going to need to see the product code.

The first thing I did was look at the Related Products Slider code ( in product_detail.tpl.php starting @ line 114):

[php]<?php if(count($this->arrRelatedProducts)>0):?>
<?php $this->sldRelated->Render();?>
<?php endif; ?>[/php]

Then I compared it to the custom code I already had in the Custom Page Template :

[php]<?php if(isset($this->pnlSlider)):
foreach($this->pnlSlider->links as $ind=>$prod){
$this->pnlSlider->links[$ind][‘title2’]
= _xls_currency(Product::LoadByCode($prod[‘title2’])->Price);
}
$this->pnlSlider->Name = ”;
$this->pnlSlider->Render();
endif; ?>
[/php]

As you can see it was very easy to carry over into the Related Products Slider – since its practically the same, I only had to change the name of the slider.
From pnlSlider to sldRelated

Here is the final code:
[php]<?php
foreach($this->sldRelated->links as $ind=>$prod){
$this->sldRelated->links[$ind][‘title2’]
= _xls_currency(Product::LoadByCode($prod[‘title2’])->Price);
}
$this->sldRelated->Name = ”;
$this->sldRelated->Render();
endif; ?>[/php]

Maybe not incidentally, if you want to be able to get rid of the default title of the slider $this->sldRelated->Name = ”; will do that.
This way you can add your own heading HTML above the slider code. This will also stop the in-line styling and external CSS for the Slider Name kicking in. There’s nothing wrong with white text with CSS3 text-shadow. If it matches your design.

Example: [html]<h2>You Might Also Like</h2>[/html]

This is what the one I was working on looks like

@#$% SSL Image file breaking SSL connection on my latest project

I’ve been working on a new project customizing another Xsilva Lightspeed Web store with WordPress integration because that has been my ultimate goal and everything has been going along perfectly except it came down to testing the SSL connection for the customer registration and checkout pages (these 2 urls auto redirect to https:// if you turn SSL on in the admin panel). Well, the addressbar would start off a beautiful deep blue and the lower right hand of the locationbar lock icon would load but when it was all done zam! Lock icon broke, blue address bar disappeared. Nooooo.

The 1st thing I did to troubleshoot was make all links use / instead of http:// even though you can use http in urls that are not scripts or images. Then I took out some of my WordPress footer widgets,thinking it might be the Twitter Pro widget or something, but nope. Then I thought why not check all the media files with Tools >> Page Info >> Media? But every media file listed began with https:// so I closed the Page Info window and went back to work but it kept nagging me.These 2 pages must be secure, no way around it. So I opened Tools >> Page Info >> Media again and clicked on each image url to get the preview and there was the culprit, the default search icon -even though I did not want to use it it was being loaded into the page anyway. I’d loaded my own image folder to use in my stylesheet to reduce the clutter a bit and I did not have a search_go.png yet. So even though the path to the file was redirecting correctly to SSL, because it returned a 404, the secure connection was breaking.

The developers of Web Store give us a lot to work with but oftentimes some things are out of our hands. Things like input value and in this case image src are coded into the the template like this:
[php]<span style=""><?= $this->misc_components[‘search_img’]->Render(); ?></span>[/php]
Src file searchbox.tpl.php
Thankfully this is the easiest thing to fix, I just uploaded my search_go .png and it overwrote the default. Then I clicked back to my register page and this time the SSL connection remained alive! Who would have thought it could be something so small causing this much trouble?

Add a Facebook Like Button to Your Xsilva Lightspeed Webstore Product Details Template

This tutorial demonstrates one method of getting the Facebook like button into your product detail tpl using XFBML which is Facebook Markup Language.
Difficulty: Medium
Requirements: You must be able comfortable editing webstore template files.

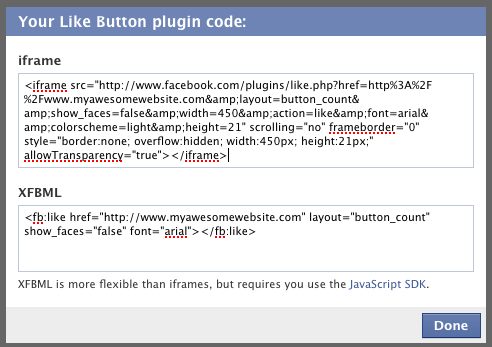
First configure your Like button . Hint, don’t reduce the size too much than the default which is 450. Much more information is available on the button configurator page.

Next make a backup of these 2 webstore template files:index.tpl.php and product_detail.php so that if you massively mess up you can just upload them and things will go back to normal.

We can add 2 of the 3 Open Graph tags required by Facebook because we have the code for dynamic meta titles. Open index.tpl.php in a text editor like Text Wrangler, find *@ lines 69 to 72 “@” in case you have made changes and line numbers have changed.

[php]<?php global $strPageTitle; ?>
<?php if (isset($strPageTitle)): ?>
<title><?= _xls_get_conf(‘STORE_NAME’, _sp(‘Shopping cart’)); ?> : <?php _p($strPageTitle); ?></title>
<?php endif; ?>[/php]

I reversed the order from the default phrasing because it’s good SEO to place the Page,Category or Product Title before the Site Title (Store Name in this case) but I digress.

[php]<?php global $strPageTitle; ?>
<?php if (isset($strPageTitle)): ?>
<title><?php _p($strPageTitle); ?> | <?= _xls_get_conf(‘STORE_NAME’, _sp(‘Shopping cart’)); ?> </title>
<meta property="og:title" content="<?php _p($strPageTitle); ?> | <?= _xls_get_conf(‘STORE_NAME’, _sp(‘Shopping cart’)); ?> "/>
<?php endif;?>
<meta property="og:site_name" content="Put Your Store Name Here"/>
[/php]

There’s one other og tag but I haven’ t figured it out, yet anyway here it is:

[html]<meta property="og:image" content="" />[/html]

Template files for the most part display product photos as background images which makes it trickier to do this one.The product slider you see on Custom Pages does use inline html photos but there is no access to the code that generates the HTML for the sliders… excuses excuses, I apologize. 2 out of 3 ain’t bad.

Moving on, we have to paste some Javascript into the bottom of the index.tpl.php template – I put mine before the last 2 lines of this file:
[js]<script src="http://connect.facebook.net/en_US/all.js"></script>
<script>
FB.init({
status : true, // check login status
cookie : true, // enable cookies to allow the server to access the session
xfbml : true // parse XFBML
});
</script>
<?php $this->RenderEnd(); ?>
</html>
[/js]

Edit alert !

Totally forgot about SSL on checkout and that http://connect.facebook.net/en_US/all.js index.tpl.php will break the security of the checkout page. Silly me. Not having time enough to write a solution on the spot – a simple solution is to host the file yourself, just download the file and upload it to the assets/js folder on your server. Then change the script src to “assets/js/all.js” and you’re good to go. Self hosting this file means that we have to keep an eye out for updates,though.

Now we can move on to putting the button in our product_details.tpl.php template. When it comes to advising you where in product_detail.php you can paste this code there are certain difficulties but here is where I recommend placement for an Unedited Deluxe product_details.tpl.php @ line 90, 89 is where the product description tag is. It makes sense to add the like button near the description.

[php]<p><?php $this->lblDescription->Render() ; ?><fb:like href="http://www.myawesomesite.com/index.php?product=<?php echo ($this->prod->Code) ?>" layout="button_count" show_faces="false" width="400" action="like" font="arial" colorscheme="light" /></p>[/php]

Yes, right in the paragraph tag! What an outlaw.

Use WordPress Rss Feeds to Show a Featured Content Gallery In Lightspeed Webstore Landing Page

WordPress+Simplepie+Lightspeed, awesome. In my last post I showed you how to make a featured content gallery with the_post_thumbnail. And in this post I talked about how to use Simplepie to show a WordPress feed on your Webstore.

I’m not going to lie, it requires extra work to use WordPress to enhance your Webstore. But it’s worth it. Because, lets face it, Webstores out of the box need a bit of pizazz.

In my last post I linked to a demo of a featured content gallery in a WordPress site. Snore, everybody has them on their WordPress sites, big deal, right? Well the only reason I built it was to learn how to build the exact same thing for a Webstore custom page using RSS feeds. And thanks to my friend David Auerbach over at dijitalfix.com I know how to code it into custom_page.tpl.php and have it show only on the landing page.

So enough chitter chatter, here’s the plain custom_page.tpl.php
[php]
<div style="padding: 15px 25px; line-height: 1.5em;"><?php echo $this->content; ?></div>
<?php if(isset($this->pnlSlider)): ?>
<br style="clear:both"/>
<?php $this->pnlSlider->Render(); ?>
<br style="clear:both"/>
<?php endif; ?>[/php]

Here’s my code:
[php]
<?php if($_GET[‘cpage’] && $_GET[‘cpage’]==’intro’):?>

<div id="product-specials">
<div id="slider">
<div id="sliderContent">
<?php foreach ($feed->get_items(0, 12) as $item): ?>
<div class="sliderImage"><?php print $item->get_description(); ?>
<span class="right"><a href="<?php echo $item->get_permalink(); ?>"><?php echo $item->get_title(); ?> </a></span></div>
<?php endforeach; ?>
<div class="clear sliderImage"></div>
</div><!–slidercontent–>
</div><!–slider–>
</div> <!–product specials–>
<?php endif; ?>
<?php echo $this->content; ?>

<?php if(isset($this->pnlSlider)): ?>

<?php $this->pnlSlider->Name = ”; ?>

<?php $this->pnlSlider->Render(); ?>

<?php endif; ?>
[/php]

This line makes sure the gallery only shows on the “Welcome to my Store” custom page:

[php]<?php if($_GET[‘cpage’] && $_GET[‘cpage’]==’intro’):?> [/php]

If you have re named the Page Key from intro to something else Please make sure to make the changes,OK?

I’ve coded it to show 12 feed items in the gallery. For more or less items, modify this line:

[php]<?php foreach ($feed->get_items(0, 12) as $item): ?> [/php]

A commenter said that they changed this line:
[php]<?php print $item->get_description(); ?>[/php]
To:
[php]<?php print $item->get_content(); ?>[/php]
and was happier with the results. Try both out.

This line
[php]<?php $this->pnlSlider->Name = ”; ?>[/php]
takes off the title of the Webstore product slider.
If you want it put back in just comment it out or cut it.

Ok, so before you run off and start modifying your custom page templates…
I hope it goes without saying you have to have WordPress installed on your server.
You also have to have Simplepie installed on your server.
Download Simplepie
Just make a folder called inc in your directory root and upload simplepie.inc to it.
Then make another folder called cache. That’s it, Simplepie is now installed.

Insert this code at the top of your index.tpl.php:
[php]
<?php
include_once $_SERVER[‘DOCUMENT_ROOT’] . ‘/store/inc/simplepie.inc’;
//full link to your wordpress, either just the site:
$feed = new SimplePie(‘http://www.mysite.com/wordpress/feed/’);
$feed2 = new SimplePie(‘http://www.mysite.com/wordpress/category/feed/’);
function image_from_description($data) {
preg_match_all(‘/<img src="([^"]*)"([^>]*)>/i’, $data, $matches);
}?>
[/php]
I’ve included 2 kinds of feed links there. One links to posts and one links to categories. If you have a Specific category add it in after /category and before /feed/.

There must not be blank space before the < ?php or you'll get that error message "Cannot modify header information,etc" and your store will go down. So make sure there is no blank space, ok? Also if you want to link to a specific category feed and you have a category base name make sure to include that name before the ending /feed/ like this: http://www.mysite.com/wordpress/my-category-base-name/feed/. I'm also assuming you have permalinks turned on. If you don't you should turn them on. If you want to show your whole blog in the featured content gallery slider doo dad--all the posts, no matter what category they are from, just use the link to the feed. Here are the kinds of rss feeds available. (Not sure about using the RSS .92 feed link)

Without Permalinks!

“RSS 2.0″ http://www.your_domain.com/?feed=rss2”
“RSS .92″ href=”http://www.your_domain.com/?feed=rss”
“Atom 0.3″ href=”http://www.your_domain.com/?feed=atom”

With Permalinks!

“RSS 2.0″ href=”http://domain.com/feed/”
“RSS .92″ href=”http://domain.com/feed/rss/”
“Atom 0.3″ href=”http://domain.com/feed/atom/”

Extra Stuff
Because the RSS feed grabs the link to the post if you don’t take a few extra steps your content gallery feed items will end up linking to back to the blog , not the products in the featured content gallery which, depending on how you want to use the gallery, might defeat your purposes.

Oh what to do? Use a plugin that redirects using Custom Fields!
I pasted this into function.php of my WordPress theme to redirect each post link to a specific product link using a custom field:
[php]
//set the options
$key = ‘redirect’;
$status = 301;

//Hook the link rewrite function into the page_link filter
//This part replaces the page URL, wherever it is outputted, with our custom URL
add_filter(‘page_link’,’custom_field_page_link’,10,2);
function custom_field_page_link($link,$id) {
//globalize vars
global $key;

$custom_page_url = get_post_meta($id, $key, true);
if(!empty($custom_page_url)) $link = $custom_page_url;
return $link;
}

//Hook the redirect function into the template_redirect action
//This part actually does the redirect, if necessary
add_action(‘template_redirect’,’custom_field_redirect’);
function custom_field_redirect() {
//globalize vars
global $wp_query, $key, $status;

$redirect = get_post_meta($wp_query->post->ID, $key, true);
if(!empty($redirect) && is_singular()) {
//And do the redirect.
wp_redirect($redirect, $status);
}
}
[/php]

Thanks to Nathan Rice for this!

How to use it
Each time you want to create a post that is going to be featured in the content gallery make sure to add “redirect”, without quotes, into the custom field Name. The Value area is where you paste the product URL. This will make sure that when the title of the post of the RSS feed item in the gallery is clicked on it will lead customers to the product details page, not the WordPress post.

For information on gallery slider and the javascript files you will need to get it running, go here http://www.serie3.info/s3slider/