Installing LightSpeed Web Store for the 1st time

If you just bought your license and now have to figure out how to connect with the web store database the first thing you’re asked to do is to create a database using your hosting plan cpanel – oh you didn’t know that your LightSpeed connected with a database? And you don’t know what a database is or for that matter what a cpanel is?

OK, hold up. I’m not about to go into all the technical details here. Chances are if you’ve purchased a license for the LightSpeed eCommerce Connector (connects and uploads your product inventory to an online store powered by LightSpeed’s native app: web store or to Magento) you’ve hired a designer/developer to customize the online shop. And chances are also that this designer/developer knows how to install either one.

So you usually won’t have to know what a database is or even have to ever create one, even though it is a snap to do through any modern version of a control panel (cpanel for short). Your designer/developer will probably upload the web store files for you and can even install the web store for you,too.

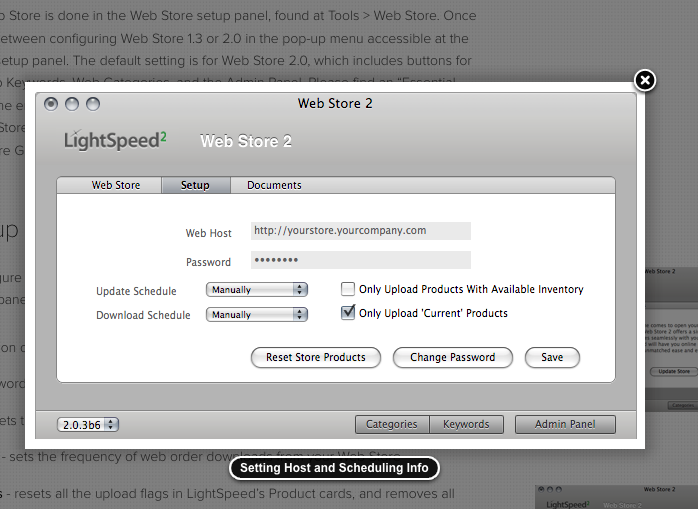
But someone on your end is going to have to input 2 very important bits of information in LightSpeed following this path: LightSpeed > Tools > eCommerce > Set Up (in older versions of LightSpeed the connector can only connect to Web Store so the path is Tools > Web Store > Set Up). In Set Up you see 2 text boxes: Web Host and Password.

In the Web Host text box input the URL/address of your web site: http://www.mydomain.com Plus the name of the sub-directory where Web Store files are located. So if you or someone else uploaded the Web Store files to a folder called shop you’d also put that in the Web Host text box: http://www.mydomain.com/shop. If the web store is in the main directory of your site (in technical terms the server root) you’d just put in http://www.mydomain.com. That takes care of Web Host.

The Password is the password you chose when you or your designer/developer installed the Web Store. Many of my clients do not install Web store themselves so I end up getting on the phone with someone and walking them through it.The Password is not the FTP/cpanel/database password. The Password is never used by anything else besides the LightSpeed eCommerce Connector. Once the Connector is connected to the server and therefore the database, you may change the Password in the Set Up panel whenever you want. But because the only thing that uses this password is the LightSpeed Connector, this is usually not something you need to do,ever.

Oh, I almost forgot! Make sure to click the Save button!

If everything is correct you should be able to access the Admin Panel by clicking the Admin Panel button.The Admin Panel is where you go about setting up things like your Store Name, your Store Phone what size you want your product images to be and whether or not people can checkout as guests, if they can use the Gift Registry and if you want to show your families ( brands) in the Web Store menu and lots, lots more.

So there you go. Those are the 2 things you need to do to get LightSpeed connected to your web site. There’s a lot more you’re going to have to do and there is a great amount of information about all of that here.
Embed Audio files for music product in LightSpeed web store

Out of the box, LightSpeed web store is not as robust as some other eCommerce solutions. But that doesn’t mean there aren’t ways to make it more robust. One such example: creating a solution to hear music samples in a Single Product detail page on the web store. We didn’t want to just click over to an external site (like the vendor’s wholesale page which had provided the samples). In my solution the customer does not leave the page to hear them.

I created a custom post type in WordPress for each CD/album title being sold on the web store. Each post has its own music player loaded with a playlist (of song previews). The .mp3 samples were uploaded with the Media Uploader and a music player WordPress plugin called Haiku was activated to play the samples. Then the links to the single custom posts were embedded in the appropriate LightSpeed Product Cards and then web store was updated.

When the link in the product description is clicked, the custom post loads and plays the samples in a lightbox window (using Fancybox which ships with web store), so the customer never has to leave the product details page to listen before they buy. All you have to do is embed the link to the custom post type in the product description and voilĂ .

Revised: Add a Facebook like button to Xsilva Lightspeed Web Store

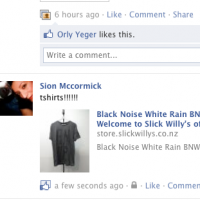
New and improved way to add a Facebook like button to the product details page template file in your Xsilva Lightspeed Web Store template. How is it new and improved? Because now we can show the product image as well as the description and link when someone likes the item and posts it to their facebook page. Thanks to Patrick from Slick Willy’s of Dunedin for asking me take the time to figure this out. I might not have bothered otherwise!

Please take care when editing your templates and make sure to keep copies of any files you edit so you can replace the edited ones if a problem occurs.

File to be edited: INDEX.TPL.PHP

On line 69 of index.tpl.php you’ll find this:

[php]<?php global $strPageTitle; ?>
<?php if (isset($strPageTitle)): ?>
<title><?= _xls_get_conf(‘STORE_NAME’, _sp(‘Shopping cart’)); ?> : <?php _p($strPageTitle); ?></title>
<?php endif; ?>[/php]

I always revise this block so that the Title of the Page, Product or Whatever comes before the Store Name. This is good for SEO.

SEO Tip: the code below can also be moved to be right underneath the meta tag for the Content-Type which is found on line 35 of index.tpl.php and looks like this: [php]<meta http-equiv="Content-Type" content="text/html; charset=<?= _xls_get_conf(‘ENCODING’ , ‘utf-8’) ?>" />[/php]

So, find the code block on line 69 of index.tpl.php and cut it. Then copy the following and paste it under the meta tag for the Content-Type:

[php]<?php global $strPageTitle; if (isset($strPageTitle)): ?>
<title><?php _p($strPageTitle); ?> | <?= _xls_get_conf(‘STORE_NAME’, _sp(‘Shopping cart’)); ?> </title>
<meta property="og:title" content="<?php _p($strPageTitle); ?> | <?= _xls_get_conf(‘STORE_NAME’, _sp(‘Shopping cart’)); ?> "/>
<?php endif;?>
<meta property="og:site_name" content="Put Your Store Name Here"/>
<?php if( get_class( $this ) == "xlsws_product"):?>
<meta property="og:image" content="/index.php?listingimage=<?php echo ($this->prod->ImageId)?>.jpg" />
<?php endif; ?> [/php]

File to be edited:PRODUCT_DETAIL.TPL.PHP

Find this: [php]<?php $this->lblDescription->Render() ; ?>[/php]

Add this under it:

[php]<div id="fbLike">
<fb:like href="/index.php?product=<?php echo ($this->prod->Code)?>" send="false" layout="button_count" width="450" show_faces="false" font="arial"></fb:like>
</div>[/php]

Button Placement Tip: you can put the Facebook like button somewhere else – it doesn’t have to go under the product description.
CSS Style Tip: wrapping the button in a div gives you more control over padding,margin and etc.

Facebook JavaScript Connection Code
Because we don’t need to connect our like button with the Facebook API site-wide – just on the product details page where the like button is, we can put the JavaScript connection code in the product_details.tpl.php template file at the bottom of the file. Go here for the code.

Xsilva Web Store Tip:Get Product Price In Related Products Slider

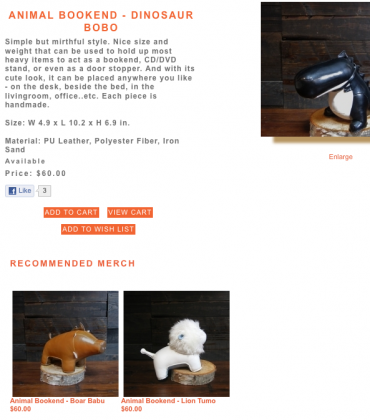
If you’re into customizing the Xsilva LightSpeed Web Store you might find it handy to be able to make the way products are displayed in the slider more like the way they appear in your main product list and your Custom Pages. Over the years I’ve had lots of requests relating to redesigning the slider that shows on a Custom Page but not many of my clients actually use the slider that appears in the Product Details Page so I hadn’t really ever bothered with it. Right away I noticed the Related Products Slider shows the product code – not the price. It can be pretty ugly especially if your product codes look like “PGH-34rjd”. I can imagine this is useful for sites that sell machine parts but the average customer is probably not ever going to need to see the product code.

The first thing I did was look at the Related Products Slider code ( in product_detail.tpl.php starting @ line 114):

[php]<?php if(count($this->arrRelatedProducts)>0):?>
<?php $this->sldRelated->Render();?>
<?php endif; ?>[/php]

Then I compared it to the custom code I already had in the Custom Page Template :

[php]<?php if(isset($this->pnlSlider)):
foreach($this->pnlSlider->links as $ind=>$prod){
$this->pnlSlider->links[$ind][‘title2’]
= _xls_currency(Product::LoadByCode($prod[‘title2’])->Price);
}
$this->pnlSlider->Name = ”;
$this->pnlSlider->Render();
endif; ?>
[/php]

As you can see it was very easy to carry over into the Related Products Slider – since its practically the same, I only had to change the name of the slider.
From pnlSlider to sldRelated

Here is the final code:
[php]<?php
foreach($this->sldRelated->links as $ind=>$prod){
$this->sldRelated->links[$ind][‘title2’]
= _xls_currency(Product::LoadByCode($prod[‘title2’])->Price);
}
$this->sldRelated->Name = ”;
$this->sldRelated->Render();
endif; ?>[/php]

Maybe not incidentally, if you want to be able to get rid of the default title of the slider $this->sldRelated->Name = ”; will do that.
This way you can add your own heading HTML above the slider code. This will also stop the in-line styling and external CSS for the Slider Name kicking in. There’s nothing wrong with white text with CSS3 text-shadow. If it matches your design.

Example: [html]<h2>You Might Also Like</h2>[/html]

This is what the one I was working on looks like