Still Get HTTP Errors When Uploading Pics To Your WordPress Posts or Pages?

The HTTP error may be fixed for most WP users but *most* people making their install open to those who have a valid password that is protected by .htaccess & htpasswd can not use the flash based uploader. I say most because maybe it’s just me and like 2 other people.

The Flexible Upload Plugin (valid up to wp-2.5.1) lets you upload more than one pic at a time. Yay! But just like your relationship status in Facebook, it’s complicated.

Long and Boring and Interesting only to Me Case History:
Once or twice a week I update a private subscription-based member’s only website. It’s a little bit of creativity mixed in with a whole lotta data entry.But who is complaining? It’s a paycheck and you know you need a steady one.

I sputtered along using blasted Cutenews for about a year because that was the CMS in place when I got the job. Updating the member’s site was l a b o r i o u s l y p a i n f u l .

I had to download and crop photos uniformly to fit in a badly designed tables for layout template, then re upload with ftp and link manually. What a pain! There was a lot of back content in the untransferrable CN but I screwed up my courage and switched to WordPress as a CMS and built my own theme. Then I one by one re created new WP Posts for each old CuteNews Post. UGH. I was looking for something that let you transfer data from CN to WP but the one thing that did skipped linkage and images and so what the hell good was that?

At least I did not have to see all those tables anymore,right? Posting became faster but it was still not as fast as it could be. There was great room for improvement to say the least. I really needed to able to upload multiple images to a post and resize them at the same time. Being able to do this would cut my posting time considerably.

Then came WP 2.5.1. There were a few problems: the files restricting access to the member’s site also blocked the flash uploader which was first introduced in 2.5.1 and allowed multiple image uploads. So close but yet so far. Then I found Flexible Upload which allowed me to upload multiple images and resize them at the same time. Along with Vincent Pratt’s Post Templates, updating the site became much faster and more efficient. The joy was temporary: soon after I found the solution, WordPress released quite a few new versions but the author of Flexible Upload dropped the project.

The plugin became depreciated but I stayed with 2.5.1 just to keep using it although I worried that staying with an older version of WordPress would make the member’s site vulnerable. So I finally upgraded to 2.7.1 a few days ago.

Well I’ll Just Find a Plugin That Replaces Flexible Upload. OOPS, There Isn’t One.
I’d done some research prior and I’d seen WordPress.org forum support topics recommending using Scissors instead of Flexible Upload and Faster Image,too. Unfortunately these 2 plugins stilluse the flash uploader which I simply cannot use.Very few people seem to protect or privatize their WordPress installs or at least if there are a lot of people doing it they are not going to the forum to get their problems sorted. None of the fixes in the wordpress.org forum could help me get around this problem. I was stuck. I could either disable the privacy file each time I made a new post (and leave tasty private content open to the general public-do you want me to get fired?) or use the Browser Uploader (super slow!) or use NextGen Gallery. While this is a good option because you can use ftp to upload multiple images- each post would use a unique gallery. 10 new posts a week. 10 new galleries a week. Ugh.

WordPress Gallery or NextGen Gallery?
The native WordPress gallery will automatically associate groups of images to the post – nextGen galleries have to be created, images have to be uploaded and then galleries can be inserted in the post. While it is a good option for anyone not having use of the flash uploader- it added 4 more steps to my streamlined posting routine. I’d gotten it down to a zippy little science and spoiled myself.

Faster Image Insert and Scissors,Maybe?
For the hell of it I installed Faster Image Insert and Scissors and left Flexible Upload activated and I decided to try making new post with all these plugins installed. To my surprise even though there was a nasty php error message printed in the editing page, Flexible Upload still let me upload images. Scissors let me resize them and my Media Settings took care of the rest. Long story short, you can use this plugin with 2.7.1 if you cannot use the flash uploader due to the privacy settings in your .htaccess file or whatever. The options/configurations for Flexible Upload don’t seem to be functional and the php error is ugly & the uploaded images show up in a very wonky way. Take a look:

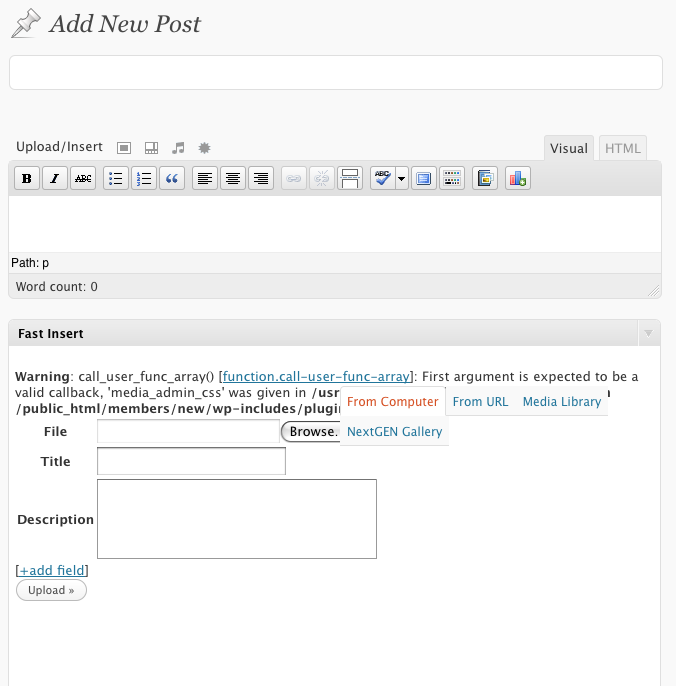
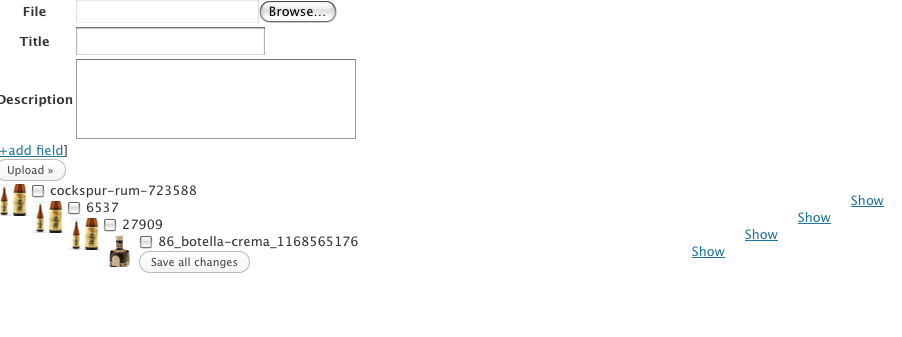
Here is a fix to get rid of the error message in the post editing page scroll to bottom of the thread . Your settings for the Flexible Upload options page will still be ignored but the uploaded image wonkiness will be gone. Pretty cool! I should state again that Flexible Upload “takes over” the Faster Image Insert area in the post edit page.

Making the change from HTML pages to WordPress

This article is for Web designers who want to switch a website that was built using dot html pages to WordPress. It is a relative snap to transfer any website, large or small, to WordPress.
The benefits of using WordPress instead of static pages are numerous. Concerns over losing ranking and generating 404’s are reasonable ones but they are concerns I am going to address in the following steps.

First Step:Get the latest version of WordPress &Install WordPress into it’s own directory.
Installing WordPress in it’s own directory allows you to work on the new design behind the scenes.If you don’t want to do that you can of course work on your own server and then upload the theme to your client’s WP installation. I like to work within the client environment so I can get to know any problems or quirks on the server before going live. Not all servers are created equal. Go to Settings>> Privacy and block search engines so that the work in progress does not get indexed if working on the client server. Or create a robots.txt file if one doesn’t already exist and type in
Disallow
/wordpress
Remember to remove this directive when going live.

Next Step:Making New Pages Out Of Old Pages.
An easy but time consuming step is copying and pasting the old html page content into the new WordPress pages and re instituting page order using the Page Order option
in the WordPress Page Editor. Number the old html pages and assign page order accordingly. If you have only 5 old pages to be carried over, you’ll be done very quickly. Designers handling the redesign of a much larger site with Parent and Child pages will have extra steps-especially if they need to build a drop down menu out of pages with child pages.Never fear:there are plugins that create dropdown menus for you. The one from We Eat Bricks looks the most promising

What the Blank is index.php?p=4? About-Us.htm looked so much better!
Using the permalink structure /%category%/% postname%
http://www.website.com/about-us.htm becomes http://www.website.com/about-us.
You choose this option in Settings>>Permalinks and find the Custom option. Paste what is in bold type into the field named Custom.

I heard recently that the fuss over pretty permalinks might have gotten a little overheated and that engines can and do index these kind of urls. But you will no doubt agree www.website.com/about-us looks a lot nicer than www.website.com/?p=4.

SEO Stuff
In my experience of redesigning websites, most had no SEO when I got my hands on them anyway but why continue on a bad path? As a web designer you might feel you should not have to worry about aspects that seem to fall more into the Marketing arena, right? Maybe. But many times the reason a client wants a redesign in the first place has nothing to do with how the site looks and more to do with such performance issues as: they aren’t getting as much traffic as they want or making many sales or landing as high in the SERPS as they would like. Fair or unfair they will probably blame you if their site doesn’t get climb higher in the SERPS after you deliver the new site. You should tell them that the more unique their content/product/service the more results they will see and that it will take time to see these results,too.Please do not make any unrealistic guarantees and make sure they are aware that the more often they update their sites the more they will be crawled.

There is one page that should not be carried over into the new design:the Splash or Intro Page.The Internet should be for offering information but because Splash Pages have very little information to offer, search engines tend to see this one page as the whole site and go away without indexing any links or real information about the website. I could go one step further and blame low performance on the Splash Page alone.The index page needs to be clean and uncluttered,true but don’t repeat the mistake of choosing style over substance.If you take a look at successful websites you will see that most put a lot of information on the index page.

All in One SEO
because WordPress doesn’t supply an option to create meta descriptions install the All in One SEO plugin.After you’ve activated this plugin each page will have a new All In One Seo option when you edit them.

Writing Meta Descriptions
If you are lucky the previous designer took care to create good meta descriptions for each page they made and then you can just paste this into the All In One SEO description field box.But if not you’re going to have to read the page content and pluck out of it a 160 character long description. 160 characters is believed to be the length after which search engines stop reading.

Using Keywords
It is argued over and over that Search Engines ignore keywords. If writing a Post instead of a Page you can use Tags and the All In One SEO plugin will use those tags as keywords.You shouldn’t worry overly about meta keywords.

Unique Page Titles
Page Titles need to be unique whether an it’s for an archive or a category or a Page page.
For Pages the title issue is taken care of when you publish the new page.Out of the box, most WordPress theme’s way of handling the title section needs a bit of help. So you should also install this code in the header.php file of the theme you are using:
[php]<title><?php

// Page or Single Post
if ( is_page() or is_single() ) {
the_title();

// Category Archive
} elseif ( is_category() ) {
printf( __(‘Archive for &lsquo;%s&rsquo;’), single_cat_title(”, false) );

// Tag Archive
} elseif ( function_exists(‘is_tag’) and function_exists(‘single_tag_title’) and is_tag() ) {
printf( __(‘Tag Archive for &lsquo;%s&rsquo;’), single_tag_title(”, false) );

// General Archive
} elseif ( is_archive() ) {
printf( __(‘%s Archive’), wp_title(”, false) );

// Search Results
} elseif ( is_search() ) {
printf( __(‘Search Results for &lsquo;%s&rsquo;’), get_query_var(‘s’) );
}

// Insert separator for the titles above
if ( !is_home() and !is_404() ) {
_e(‘ at ‘);
}

// Finally the blog name
bloginfo(‘name’);

?></title>[/php]

That will sort out Archives,Tags,Categories titles which you can also tell the engines not to index in Settings>> All In One SEO. Download the plain text file here:seotitles
I edited the file recently because of some confusion of mine over some very similar html characters:
‘ ’
« »
[html]&lsquo; &rsquo;[/html]
[html]&laquo; &raquo;[/html]
The file is using lsquo and rsquo….

Going Live
You have all your pages set up and the design is finished and you are ready to go live, what next?
Read this article on installing WordPress in it’s own directory.If you’ve followed all the steps your new WordPress site should appear when you go to http://www.website.com/. If your old index.html page still pops up then you have a little more work to do. Paste this into main .htaccess:
DirectoryIndex index.php index.html
Placing index.php first takes care of that little problem.

Redirecting Traffic 301
Gather a list of all the old site’s links.
http://www.website.com/about-us.htm
http://www.website.com/contact.htm
http://www.website.com/projects.htm

Find the top level .htaccess in your website root and open it up for editing with a plain text editor like NotePad or Textwrangler.If you use a Mac you will have to rename the file to htaccess.txt so that you can save it to reupload it. Macs hide . files.

Redirect 301 /about-us.htm http://www.website.com/about-us
Redirect 301 /contact.htm http://www.website.com/contact
Redirect 301 /projects.htm http://www.website.com/projects
Repeat this until you have covered every last page from the old website’s linkage structure.
Save the file and upload it back to the top level directory.

Last is to turn off blocking search engines in Settings>>Privacy.

Important Last Steps You’ll Be Glad You Took:
Add www.website.com to Google and Create and Submit a Sitemap in Google Webmaster Tools. You’ll also want to make good use of Google Analytics.

.htaccess=awesome

I sweated like a moe over how to fix my mistake of installing my new blog (with all of my old blog’s content) into a new directory instead of in the old blog directory.Since I was only trying it out I didn’t want to go to the trouble of doing things right.I was still dubious about just how easy it would be to set up my site to match my WordPress blog design.It was easy-so easy that my already scrappy organisational skills abandoned me and I wnt ahead and installed without thinking.Be careful not to be like me! So here is how I fixed it.
.htaccess Redirect is easy to do.

Simply paste *this into **your .htaccess file in the root of your directory:

Redirect /olddirectory http://yoursite.com/newdirectory/

*Put the correct domain name and directory names of course.

**if you don’t have one it’s easy to make one with any text editor like Notepad.

Just name and save a new file .htaccess. Open file and paste in the redirect. Then load with ftp to the root. In my case that is the same level as the public_html directory, which is called htdocs.

Thanks to javascriptkit.com

Go to their tutorial
There’s lots more on .htaccess to be found there.